Wednesday 27 March 2019

Skye Kit Handmade Cards with Cathi


Hello scrappy friends! It's me, Cathi, back again. This week I would love to share a set of three cards I have made using the Skye kits. I always like to do several cards with my kits, they are some of my favorite projects to work on!


For my first card I used the gorgeous soft pink striped Sophisticated paper from the Cocoa Vanilla Studios Midnight collection found in the main Scrapbooking Kit (TSK)This is a clean and simple card with gorgeous layers of the chipboard pieces and the sparkly Thickers found in the TSK as well. I edged the paper with Vintage Photo Distress Ink for a vintage look.  This is a card for my good friend's 50th Birthday!!


For  my next card I used some fun pieces like the twine and bark heart from the Pretty Little Pieces kit in my Bits and Pieces Kit (BPK).  The background paper is the Inspired sheet from the Midnight collection. I added a doily from the TSK. The chipboard rose is from the TSK. The butterfly and bloom and grow die cuts are from BPK.  I finished off the card with some enamel dots from the Pretty Little Kit (PLK)


My final card again used the Sophisticate paper from the TSK.  I used some twine from my stash at the base of my cluster and layered some die cuts from the BPK, a chipboard flower and a flair button from the TSK.  The crosses are a bonus gift for subscribers!

I love how they came out and how versatile this kit is! I hope you enjoyed my card set with
the Skye kit and will consider subscribing. You can find the subscriptions HERE. I've got another layout and more cards coming up soon! Hope to see you back soon!!

Tuesday 26 March 2019

Week 10 Project Life - Lydia

Good morning everyone, Lydia back to share a project using the beautiful new Skye Kits from The Scrappery Kit Club. I am very excited to be back and creating after having bit of a break while I finished and graduated from High School. I am now onto a new journey of University studying a Bachelor of Photography.

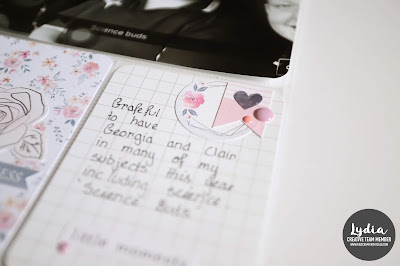
Here is the full single page pocket page spread using the Pretty Little Kit (pocket page).


Currently taking it back to 2017 to try and catch up on my Project Life album and what better way to do so is using The Scrappery Kits that are full and ready to use with all the gorgeous products from Cocoa Vanilla Studio.

Oh my!! Those Thickers were perfect to add a little tiny touch of subtle sparkle to the layout for the weekly title card as well as one of those delicate doily's.


A handmade filler card using some of the Cocoa Vanilla Studio stickers.


 Perfect amount of embellishing for a journal card.


I hope you all enjoyed this little project I have made using the new Skye kits and I cant wait to share another project soon.

Lydia xxx

Monday 25 March 2019

Messy Monday #2 with Stacy and the Skye Kits


Hey lovelies, Stacy here, and welcome back to Messy Mondays. If your new thanks for taking the time to have a look and a read, I hope you will all stick around and follow my art journal journey with The Scrappery.


This week my art journal page has some similar techniques as my first Messy Monday page with a few new ones that I need to work on. I was very close to tearing up this page and starting again as I am a perfectionist and finding it hard to let things just flow … The brush lettering was the last thing I added to the page and it was the first time I had attempted writing using this type of pen, although I am not super excited how the lettering ended up looking I was strong-willed and reminded myself this is all part of the journey … so here we go, the process of how this page come together …


Step One. Using a page from my disc-bound journal I taped all 4 sides with painters tape making sure to leave a frame for my background. For the background, I used the Blueprint Sketch Distress Paint from The Colour Kit (TCK) as well as Chipped Sapphire and Seedless Preserves from my stash. With a wet wide paint brush I did wide strokes across the page from left to right using about 1/3 of the page for each colour, overlapping them to blend the colours together. I then sat that aside to air dry.


Step Two. I stamped the butterfly images onto 300gsm watercolour paper with versafine black onyx ink and also stamped some butterflies on some scrap pieces of pattern paper I had left from the main Scrapbooking Kit (TSK).


Step Three. I fussy cut the butterflies and just the dress from the pattern paper so I could
paper piece it to my Gorjuss girl image after I had coloured her skin and hair with my copic markers. Then I fussy cut the whole image and cropped it down to the size I wanted for my page.

Step Four. I took the fussy cut butterflies that I had stamped on the watercolour paper and used the Ken Oliver and Hero Arts liquid watercolours and the watercolour brush from the TCK and messily coloured the butterfly images.


Step Five. The background had now dried so I slowly removed the painter's tape. I used a piece of one of the pretty doilies that are included in the TSK and the Bits and Pieces Kit (BPK) and used it as a layer piece between my Gorjuss image and the background. I used 3 of the butterfly images along the top of the page and one of them as an oversized hair decoration on the Gorjuss image, ( I love how this looks). I stuck everything to the page using scotch tacky glue.


Step Six. I knew when I decided to use the butterfly stamps that I wanted to use the quote ‘without change there would be no butterflies’  but had no idea how I was going to place it on the page. I decided on writing it around the border with a brush lettering pen which I had never used before but just went for it. As I said earlier I'm not super happy with how it came out but its there now and I have it to look back on in the future to see if I have made progress with my brush lettering skills.


So that is #2 to add back into my journal. I hope you enjoyed reading my little part for The Scrappery Design Team and you come back next week for #3 in my  Messy Monday’s Art Journal Journey.

Have a great week.

Thursday 21 March 2019

Snap Chat Moments Layout using the SKYE kits

Hi Scrappery Peeps,

Lisa here today to share a layout using the gorgeous Skye kits.


I have kept this layout fairly clean & simple as it I used a 8.5 x 11 layout & I have used the stunning patterned papers - which create their own beautiful back grounds.


I used some of the pre cut project life mattes to back the photos. I also used some of the pre cut frames to create some layers. (TIP* Cut these in half so you get more pieces to use)

A few enamel dots & a banner on the top right help bring everything together.


The die cut flowers were a perfect subtle addition to the page - I placed them at different heights some on foam tape & some on double sided tape.

I used some of the die cut words & the super cute tiny stickers to create my title. I love mixing it up & using more than one type of alpha.


The chipboard bunting was a perfect finish to bring all the colours together & put something in that corner in order to create a visual triangle on the layout. This makes a layout more pleasing to the eye.

Please pop over to the shop to check out our kits - the value is amazing!

You can also follow us on Facebook & Instagram.

Have a great day.


Wednesday 20 March 2019

Skye Planner Projects with Cathi


Hello scrappy friends! It's me, Cathi, back again. This week I want to share some projects I've made for my planner using the kit!  I love how versatile the kit is. I've used it for my planner, to make cards, layouts and even some mixed media projects!!  The projects above fit my A5 traveler's notebook and my wallet traveler's notebook, I literally punched holes in a standard leather wallet and added some elastics for a quick notebook for well...notes and my grocery budget price book...I love it!!


For most of the kits I love to do a notebook cover and a folder. On the left is my monthly planner insert cover.  I've used the gorgeous Midnight Bloom & Grow paper from the main Scrappery Kit (TSK) for my cover, adding a gorgeous girl cut out from the All the Things sheet from the Pretty Little Kit (PLK).  The chipboard hearts are from the TSK and enamel dots are from the PLK.  On the right is my folder. I always make a folder to hold stickers and other things for my planner. I love to change it out with each kit.  The paper for my folder is the Midnight Inky Depths paper from the TSK. The cutout is is again from the PLK and the flower die cuts are from the Bits and Pieces Kit (BPK).  The photo below shows the folder's inside.


In this photo I have a weekly planning layout using some of the gorgeous pieces from the Skye Kits.  I've used the jar, tag and flower die cuts and the clear hearts and flowers from the from the BPK.


My final two little projects are dashboards for my wallet traveler's notebook! They are the cutes covers!!  This one has a cut out from the All the Things sheet from the PLK. The silver hearts are from a bonus gift you receive with your kits!  The enamel dots are from the PLK as well.


This is such a simple little dashboard but it is one of my favorites! I love the die cut from the BPK, and the "oh my heart" sticker from the PLK.  I finished it off with a few enamel dots from the PLK.

I love how they came out and how versatile this kit is! I hope you enjoyed my planner projects with the Skye kit and will consider subscribing. You can find the subscriptions HERE. I've got some  some cards and another layout coming up soon! Hope to see you back soon!!


Monday 18 March 2019

Messy Monday #1 with Stacy and the Skye Kit!


Hello Scrappery Lovelies my name is Stacy & I am one of the new additions to The Scrappery Creative Team & could not be more excited. If you would like to know a bit more about me I have a profile up on The Scrappery website.

As well as making Happy Mail from these amazing kits I will be creating mixed media for ‘Messy Monday’s’. For a long time I have been collecting mixed media products with all intentions to start art journaling after being asked to join The Scrappery I knew with the additions of The Colour Kits (TCK) to my existing stash it was time to start my art journal journey. So I am hoping that you all reading this blog will come along with me and see my progress week to week.


I put together a disc bound art journal using 300 gsm mixed media paper. I like this style of journal as it means I can take out the page/s while I’m working on them.

You will also notice (like in my happy mail creations) the main focal point will always be a cute little girl (sometimes maybe a cute little creature) I will always list where I got this image from.

So enough of me rambling on, I will get into the details of how my very first art journal page came together.


One. I stamped the dylusions stamps onto 300gsm mixed media paper using Versafine black onyx ink (Google told me this was the best ink when using watercolour) & I printed the Vera Lane studio digital stamp onto the same mixed media paper, then fussy cut them out.


Two. After watching Ken Oliver use his watercolours on a youtube video ( I find youtube a great tool when using new tools/products) I decided the ‘indigo’ colour from the ‘Skye’ colour kit would make a great ombre background (sorry I forgot to take a photo of this before sticking everything down) but it was so easy & fun to do just with a wide brush dipped into water, a few drops of the watercolour across the top of the page and just kept brushing left to right all the way down the page dipping my brush into the water as needed.


Three. Next I watched a youtuber using the Hero arts watercolour & quickly discovered you not need very much of liquid watercolour and it goes a very long way. I used both brands of watercolour that are included in the TCK to colour the flowers, the little girl digital stamp leggings & dress. Working with watercolour is way out of my comfort zone as I haven’t as much control as I do when I use my copics, but it is a lot of fun and I will enjoy learning how to get different depths and shading with practice on my journey.

Four. In the TCK there is a Tim Holtz distress paint in blueprint sketch. I was super excited to get this colour as its one I don’t have in my stash. I actually didn’t end up using that colour but will definitely get use of it in the future ... The Colour Kits are going to be a great stash builder ... I did use 3 distress paints from my stash to show using acrylic paints & watercolours can be used together. I used a mixture of left over ‘indigo’ watercolour paint with a few drops of mustard seed acrylic paint mixed it around & got the colour for the leaves. I used the water brush to thin out the heavier acrylic paint. I then made a mix of walnut stain & antique linen for the little girls skin & just walnut stain for her hair using water to thin out the paint in some places to try & make different shading/texture for her hair.

Five. After all the paint was dry I knew I was going to make a wreath style frame with my cute little girl image as the focal point in the middle. So I just went for it sticking everything down without second guessing myself. (which is really unusual for me and I really enjoyed to freedom of it). I used scotch tacky glue putting the flowers down first tucked the leaves in next & then nestled the girl into the flower reef.

Six. Last of all I chose the very appropriate Tim Holtz Small Talk Sticker ‘ AND SO THE ADVENTURE BEGINS’ & used my hybrid gold gel pen to add some accent glittery bits.


I hope I have explained my process in a clear and easy to read way and that maybe I have encouraged some (hopefully all) to join me in my new adventure and come back next Monday to take a look at Messy Monday’s #two

Thanks for joining me.

Wednesday 13 March 2019

Shine: A Traveler's Notebook Layout with the Skye Kit!


Hello scrappy friends!! Cathi back with a traveler's notebook layout using the gorgeous Skye kit and the beautiful Cocoa Vanilla Midnight collection!!  I love using my A5 traveler's notebook to do layouts these days! I have boxes and boxes of the large 12x12 size layouts but I never really look at them anymore. With my traveler's notebook, I have easy access to them and can file them away in monthly notebooks!

My layout uses the beautiful Sunset Strip paper as its background, I love the beautiful watercolor wash effect of the darker colors on this paper, really stunning.  You can find all the papers in the Midnight collection in the main Scrappery Kit (TSK).  The photo is of my daughter in her Christmas performance of the Nutcracker with the regional youth ballet here in Ireland. I just love this photo the photographer captured! She is growing up so fast!


In this photo you can see that I've taken a doily from the Pretty Little Kit embellishments kit and used that to layer my photo. I popped the photo up on a bit of foam tape to give it some dimension.  The flag and the leaves are from the die cuts in the Bits and Pieces Kit (BPK)   The gorgeous silver hearts were a bonus for subscribers this month!  The love you and heart are chipboard shapes, also from the TSK.

In the lower part of the layout I've layered several flower die cuts from the BPK and used the Shine die cut from the TSK.  I love using the flairs and you can find those in the main TSK as well.  The be yourself and so lovely word stickers are from the Pretty Little Kit (PLK). I finished off the layout with a few Pink Fresh studio dots from the  PLK as well. 

I love how the layout came out and am glad I documented this memory! I hope you enjoyed my second first layout with the Skye kit and will consider subscribing. You can find the subscriptions HERE. I've got some planner designs, some cards and another layout coming up soon! Hope to see you back soon!!