Friday, 12 December 2014

PAPERCUT LABS CHRISTMAS BLOG HOP

Hey guys, good morning. This morning on The Scrappery Blog we are doing something a little different. Today we are fortunate enough to be involved with Papercut Labs and their 12 Days of Christmas Blog Hop! We love supporting Australian scrapbook businesses and Papercut is a wonderful resource that usually was only available from American companies. They are an online classroom, focusing on scrapbooking and other papercrafts. It is so great to see this resource highlighting the potential we have over here in Australia.

 photo unnamed_zpsd0c83db1.jpg

Here is a list of all the participants in the blog hop. We are already 5 days in so be sure to keep up with the list and write it all down. There are some pretty amazing contributors in this list!!
Monday, 8 December 2014: Papercut Labs
Tuesday, 9 December 2014: A Piece of Cake Designs
Wednesday, 10 December 2014: Kellie Stamps
Thursday, 11 December 2014: Heidi Swapp
Friday, 12 December 2014: The Scrappery <<<< HERE WE ARE!!
Saturday, 13 December 2014: Seriously Scrapbooking
Sunday, 14 December 2014: Maya Road
Monday, 15 December 2014: Stampin’ Up!
Tuesday, 16 December 2014: Scrapmatts
Wednesday, 17 December 2014: D-lish Scraps
Thursday, 18 December 2014: Studio Calico
Friday, 19 December 2014: Papercut Labs

Papercut also has a Cybercop happening over on Facebook. Go and join up. There are an amazing amount of prizes from some amazing international brands and awesome Australian companies. There are a stack of challenges to compete in to increase your chances of winning. I just wish I had time to participate. Some of the challenges are really inspiring.

We are donating two of our kits to the prize pool so please go and participate and you could win one of our amazing kits!
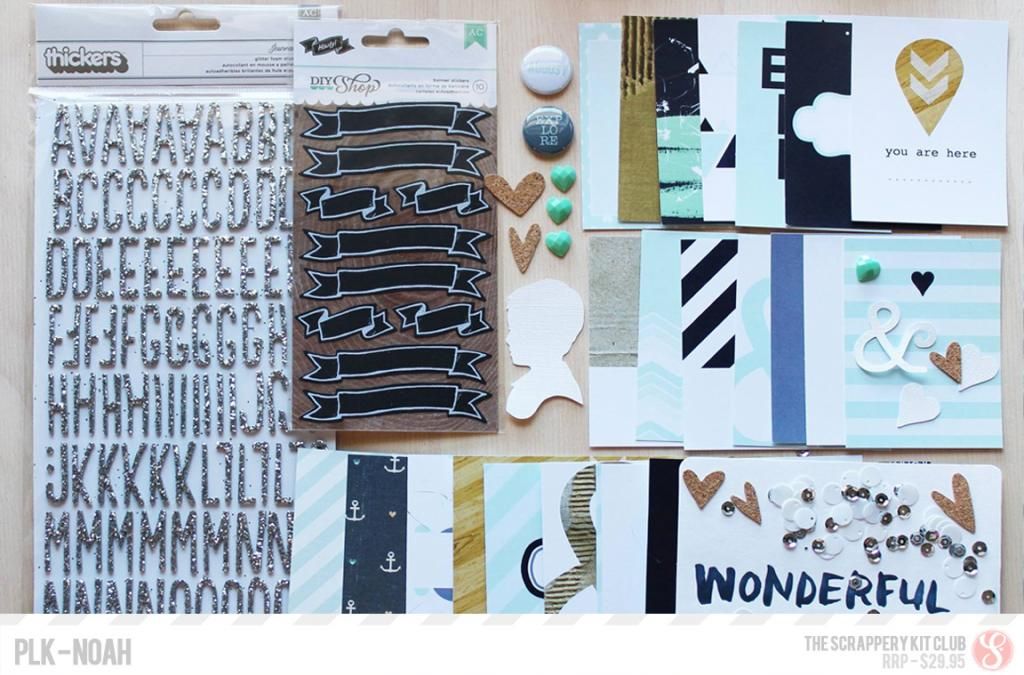
 photo unnamed1_zpsa81ca7bf.jpg

Our PLK - is our Project Life inspired kit, featuring exclusive hand designed and Australian printed Project Life sized cards and a range of embellishments, cut outs and of course, Thickers. Every kit we like to include Thickers!! 

 photo unnamed2_zpsb827c7b2.jpg

Our BPK is our embellishment kit and for our second prize we are giving you our NOVEMBER PLK - This was one of our most popular BPKs with neon enamel dots and that amazing Amy Tangerine - Stitched stamp set. Such great value!

Want to win one of our kits or one of the other amazing prizes up for grabs? Check this out.

*All the below details are from the Papercut Labs site and can be found here*

Everyone who joins the crop party event on Facebook goes into the draw to win one of twenty-four prizes (two from each sponsor, and four from us).

However, to improve your chances of winning one of the giveaways, you can:

a. Create a project (card, layout, OTP, something paper-y) inspired by the challenges and upload it to the event page. Doing this, you’ll receive SIX entries into the giveaway draw. (Make sure you tell us which challenges you used!)
b. Comment on a project on the event page, and you’ll receive another one entry into the giveaway draw.

To see the challenges visit here

You have until the 20th of December to participate! So get in there and get creative!!

Now onto our contribution for the blog hop. Charm has created some amazing christmas cards using our old BPK Elsa - which is still available in store. I had a little fun with this months BPK Noelle and created a few cute little tags. Finally, Adele has created an adorable bunting for Christmas using last months TSK - Camille, this months BPK Noelle and a variety of other pieces from her own stash. So sit back and get ready to be INSPIRED.

**************

Hello! Charmane here! Just for something different I'm going to show you some simple cards I have made using The Scrappery Elsa BPK {which is the *Bits & Pieces* Kit} I believe there is ONE in stock HERE!

I just fell in love with all of the Silver in this kit, and knew exactly what I wanted to do with those Silver Glitter Triangles - make Christmas Cards with TREES on them, of course!

But first I wanted to create a unique background using the Mister Huey's Silver Mist, I've done this by using the "Watercolour" Background technique that I've seen being used by others - this is where you use scrunched up plastic packaging, spraying a few squirts of mist and then scrunching it onto your Cardstock... simple!

 photo CHARM2_zpsd23eedc6.jpg

Then I've added my stamps {you may recognise them from another Contributor?}


 photo CHARM3_zpsf5fe7fc4.jpg


I've then added the CUTE Dear Lizzy Silver glitter triangles, and also the Studio Calico Mistable Stars from the ELSA BPK and my own handmade Chevron...I've then added a border by using a journalling pen, then stuck it to a pre-made blank white card! Done!


 photo CHARM1_zps7cf4a931.jpg

Here are a few more similar ones that I have made using the same background technique... I have also used the Studio Calico Silver rub-ons from the ELSA Kit on these cards too.

 photo charm5_zps289f88c1.jpg

I'm planning on giving these {and more that I've made} to my relatives at my up and coming Family Get Together - I can't wait! Bring on Christmas!

I hope you all Have a Merry Christmas & a Happy New Year!

xo Charm

                                     **************

Wow Charm those cards were amazing!! After all that amazing eye candy, I think I am just going to give you one photo of my cute little tags and then the process video I created to show you all just how easy they are. 

 photo naes1_zpsffe7c051.jpg


 **************

Merry Christmas fellow Scrappers!

This week I have been working on some homemade Christmas decorations for my new house, including this pretty no-so-traditional bunting for my fireplace. Here’s a little step by step process to make these beauties, and the great thing is, they are completely customizable! Include photos, text, even journaling!

1. Start with two packets of DIY Shop Large Chipboard Pennants and a collection of papers from the past couple of TSK kits from The Scrappery

2. Attach the papers to the pennants using a dry adhesive (wet may cause buckling of the paper). 


3. Order your pennants in a desired colour order. I decided on a random scattering of papers but you could consider a pattern, or an ombre effect of colours too!


4. Now it’s the fun part…EMBELLISHING! Add as many (or as little) embellishments as you like! I used a variety from the BPK Noelle and various thickers from past kits and my stash. I also added a few Christmassy photos too!


5. After you have finished embellishing your beautiful pennants, it’s time to string them together! I re-poked through the paper to make the holes visible, then grabbed some gold and white baker’s twine from my stash and threaded them together. I used 11 pennants in total, which is about 2 metres worth of bunting.


6. Now hang your beautiful creation!


Hope this can give you some ideas for some no-so-traditional decorations for your home! 

Adele xxx

                                        **************

Thanks so much for joining us on this blog hop. I hope that we have added to the tons of inspiration you have already received from some amazing designers. Be sure to continue to follow along to continue your Christmas DIY inspiration.

Merry Christmas everyone and we hope you have a very creative New Year xoxo


Thursday, 11 December 2014

November Kits - Camille & Vincent - Layout & Cards (with Sophie)

Hey guys! I'm back today with a layout, using Camille, and a couple of cards using mainly the BPK, Vincent. I hope you likey!

For this layout I wanted to restrict the colour scheme to blue, pink, gold and silver. So I did!
I don't know if you'd realised but this is totally not my style to use a patterned paper as my background piece. But I wanted to use this piece because it features a lovely subtle pattern in soft colours which I love. That is definitely the easiest combination to work with and there are a few in the kit.

For this card I used one of the Amy Tangerine chipboard cards and took two acorns from the ephemera pack (from Camille) and stuck them over the top to create a 3D effect. I really love how it turned out. It ads a little extra interest and dimension to the card. 
I also adhered the card with some double sided mounting tape. It's these simple tips that can really make a simple design that little bit more interesting. 
 As you can see this last card has a completely different feel! I used the Freckled Fawn neon dew drops and Amy Tangerine brads which are both from the Bits and Pieces Kit. Also from the BPK is the 'Hello' stamp. I love the cross stitch design. To fit the word on the card I stamped half at a time.
I really love the contrast of the bright colours against the black! So awesome. 

Thanks for stopping by the blog today! I hope you are inspired to get creating with your kits! I'm super excited to get creating with Clara!
I'll see you next time with a layout featuring her!

See ya, 
Sophie 


Tuesday, 9 December 2014

November TSK - Camille - Thank You Cards - by Charm


Hello Everyone! Well, it's that time of year again! To make THANK YOU cards for all of the kids teachers - this year I have remembered and have actually made time to make some!

I always am hesitant making them, usually thinking that I can't do it, not enough time, or I've forgotten how to make them. This time however, I found it really easy to whip these two up using the GORGEOUS November TSK - Camille!


All I needed was a little bit of playing with layering a couple of patterned papers from the kit, and a tag & a few Amy Tangerine Ephemera pieces and Enamel dots!


I found the easiest way to attach the layers was to staple them altogether. I've then added a border using a journalling pen, and attached to an already made card using double sided tape!


I love the textured Amy Tangerine Ephemera - of course with a touch of gold foil!


I thought the "ruler" was perfect for a teacher card too...


The alphas I used for "Thank You" are from the PLK Riley Kit which is currently 30% off at The Scrappery - don't forget this fabulous SALE which ends on the 31st Dec 2014 
{make sure you use the code}


I hope I've inspired you to make YOUR Thank You Cards - it really does only take a minute or two - just grab a few bits from your stash and see how you go!

Happy Christmas/End of Year Creating!

xo Charm

Monday, 8 December 2014

November TSK - Camille - Kayla

Hi there guys. It feels like it has been ages since I have been here to share a blog. It's been rather crazy in this household with moving house and then being sick for pretty much the whole of November <<< not much fun!

I was excited however when I got my happy box of goodies from The Scrappery in the mail. I absolutely fell in love with the kits especially Camille.

Here is a look at my first layout created with the kit (with some pieces from BPK and PLK thrown in the mix too). I have another layout finished with a process video that I will be sharing soon.


I absolutely loved the gorgeous Amy Tangerine Stitched papers and embellishments in this kit. I also used one of the gorgeous Maggie Holmes Ribbon tags and glittery bows from the Pretty little kit and the gorgeous wood veneer word (family) and one of the Plus One Brads from the Bits & Pieces kit.

 photo KAYLA12_zps5c9854c2.jpg

I love adding stitching to ephemera. For such a 'flat' embellishment - it really makes it pop! A little bit of texture here and there is what I love! I also used the Heidi Swapp Velvet Black Colour Shine for my mist dots and as you can see I added my usual vellum to soften the tones of this layout down and add another texture.

 photo KAYLA123_zpsb18059fb.jpg

I added a spray of the gorgeous mint coloured Heidi Swapp Colour shine that came in a Bits and Pieces kit a few months ago. I love how the colour works with the layout.

 photo KAYLA1233_zps719b3a08.jpg

Here you can see the gorgeous wood veneer word from the Bits and Pieces kit. I decided to keep it natural for this layout to tie in with the kraft paper I used in one of the layers behind the photo.

 photo KAYLA12333_zpsf0f35689.jpg

And a last little snapshot of my layout. I absolutely *love* the glittery bow.

I hope you enjoyed this little look at my layout and I can't wait to show you more! 


Thursday, 4 December 2014

December Projects - Starting December Daily (eeeek!)

Hi everyone!

I am so excited to share the start of my December Daily 2014 adventure with you. I am a little nervous as I have never done a DD album before! But after watching hours (yes hours) of DD process videos on YouTube I decided to take the plunge…

First of all, I knew that I would need to organise a mini kit of sorts for myself during November, so that when December rolled into town I would be prepared. Kind of.
I began by deciding on a rough colour scheme for the album. Personally, I am not a green gal. Red? Definitely! But not so much the green. I decided on red, turquoise, gold, kraft and light pink as my key colours, with touches of wood grain and black dispersed throughout. Of course, I’m not ruling out green altogether, nor any of the other colours of the rainbow. But I knew I needed a few focus colours to get me started. 


I found this Studio Calico 6”x8” Handbook in script font and feel in love at first sight!


Next, I started looking through my stash for bits and pieces I could use, including elements from the much loved Maggie Holmes Open Book collection which features in last month’s kits, as well as some older Notes and Things collection from the Audrey TSK a few months ago.

Finally…and I was half dreading/half bouncing in excitement, for the next part of my organisation plan…SHOPPING TIME!! I bought a few pieces from 2014 Christmas collections to bulk up my mini kit, including the Kaiser Craft Captured Moments PL cards in the Peppermint Swirl collection – perfect colours! I placed all my goodies in my glass dishes to make sure I could see and access everything…and also, well, it makes it all look so pretty! Hehe :P

 photo adelephotos_zpsa89d766c.jpg

I created this title page using a wide range of supplies, including some of the papers from the Audrey TSK as well as a December Daily wood veneer I picked up somewhere along the way. As you know, I love embellishing and my title page is no exception!


I took quite a few photos on December 1st as my hubby and I put up our Christmas tree, yippee! I added a shaker pocket using a collection of star sequins and wood veneer as well as w Tim Holtz flash card.


I taped closed this pocket due to the bulkiness of the other side – it was driving me a bit crazy sliding out!


On the reverse side, I added a basic filler card with some vintage ephemera as well as a before photo of our empty tree space.


Using a 4 pocket protector, I added some 3x4” cards from the Noah PLK to support my festive tree pictures. I also added a few random Christmas phrase stickers from various collections and some Heidi Swapp vellum ephemera. I raided my Willow and Camille PLK to get some Maggie Holmes Open Book vellum pieces and ephemera to add some depth to the page.


And that’s Day 1 done! Stay tuned while I keep you updated on the rest of the album. I would love to hear some tips and tricks from those who have created DD albums before! Please leave me a comment if you have any ideas for special things to document or products to use.

Thanks for having a peek at my album everyone, and remember…only 23 sleeps til Christmas!!

Adele xxx