Friday 26 April 2019

Planner Spread with Lisa - using the Skye kits

Hi there Scrappy Peeps,

Lisa here with today with something a little different.

Yes, first & foremost I am a traditional scrapbooker, I do also make cards, tags, Project Life pages, Travellers Notebook pages, embellishments, Happy Mail & Planner spreads.

Pretty much anything to do with paper really...lol 


Today I have a Planner Spread for you I created using the Skye kits ๐Ÿ˜

I try to plan regularly, but it doesn't always happen.

I have a 'Mambi' Happy Planner this year.

I have tried many Planners, searching for that elusive Planner peace.


Here is a look at the full spread.

I used lots of bits & pieces from all the kits. The stickers work really well as they are a great size.

I cut pieces of patterned paper to fill some of the boxes.

As much as I love top pretty up a planner spread, it still needs to be very functional for me.


I used a circle punch to punch out partial circles from co-ordianting paper for the date icons.


Here is a closer look at the left & right sides.

How cute is my Month Jar! The cute jar of hearts ephemera piece with the Pink Fresh alphas were perfect to highlight the month.


The transparent stickers add a really nice touch to the pages.

I did add some random icon stickers from my stash to stretch things a bit further.


Sorry I don't have as many photos this week, just felt these few pics pretty much show it all.


I hope you have enjoyed me mixing things up & showing how versatile out kits are.

Have a great week.


Monday 22 April 2019

Happy Mail Monday


Stretching my Skye Kit

with Stacy


Welcome back lovelies to Happy Mail Mondays.
This week I will be showing you how I made what I had left from the TSK & BPK  Skye kits stretch to make one more creation even with only having the smallest amount of one piece of the pattern paper left. (see photo above).

I took from my stash papers I liked that went with the remaining pattern paper from the TSK.
In the photo above are a collection of different pattern papers and coloured card stock. I didn't choose anything that was going to take away from the ephemera pieces and stickers i had left to use. 

Front cover - Frames and heart tab were in the 'Midnight' ephemera pack from Cocoa Vanilla Studios ( PBK ), the chipboard banner was from the Cocoa Vanilla Studios 'Midnight' chipboard pack.
The little girl is a CC designs stamp and I stamped her used my Copics to colour her and then stamped her again on the piece of pattern paper I still had from the 'Skye' TSK and paper pieced her little dress and shoes.

The 2nd & 3rd pages of the Flip Book include a memory dex card ( on the left ) i will get back to that a little later. On the opposite page I again stamped a CC designs stamp but this time left her black and white just using some Stickles to add some sparkle to her skirt. I used a frame from the chipboard pack and randomly placed ephemera around the outside of the frame. On the tab I used one of the little word stickers from the sticker pack from the 'Midnight' collection which is included in the BPK. I was really happy how pretty this page turned out.

This is the Memory Dex Card ( if you are unsure of what a memory dex card is there are a lot of videos about them on YouTube and lots of posts on Pinterest) I really like adding them when I make Happy Mail as a lot of my PenPals collect them & it is another different type of paper craft to enjoy creating.
This particular memory dex card I made using a die i have and it is a little pocket. I used magnets as a closure to keep the flap closed and then I cut flowers from the papers i was using including the paper I had left from the 'Skye' TSK. When i was die cutting the flowers I had the idea that maybe when I use the brad to keep the flowers together they would magnetically join to the magnet i had hidden in the flap of the memory dex card & my idea was a success letting me interchange the different flowers. I have never seen this done before & was thinking of all the possibilities that I could make for future memory dex cards. Not only using brads in different shapes but also adding metal pieces. 
I call this the interchangeable Memory Dex Card.


The 3rd & 4th pages ... On the 3rd page I made a pocket and added some die cut paper bags, on the front of the pocket I added a decorated one of the die cut paper bags using paper scraps and a flair from the 'Midnight' collection from the TSK. Inside the paper bag I added some ephemera to share with my PenPal. Page 4 is another page I had fun decorating using a beautiful doily ( there was doilies included in both the TSK & BPK )
I again used a CC design stamp and copic coloured and paper pieced her.

The 5th & 6th pages - Page 5 ( on the right in the photo above ) is my 3rd decorative page using chipboard pieces & ephemera with my copic coloured and paper pieced image.


 The 6th page is a pocket I made with a flap that has  a  tab closure with velcro on it.
I made some decorated die cut tickets and added some blank ones for my PenPal to have to decorate.On the outside of this flap i used a doily (from my stash) some of the pattern paper from the TSK  as well as an ephemera piece from BPK and a little word sticker from the sticker pack in the BPK. Inside the pocket I again used more ephemera pieces.

In the photo above are the items I have left from the 'Skye' TSK, BPK, & PAK.
Pieces I will now add into my stash from this kit I have made 
3 very chunky Happy Mails,
 a box of note cards,
 used some of the paper in my art journal
 so as you can see you will really get your money's worth when purchasing kits from
The Scrappery. I have one more Project that will Probably share on The Scrappery Instagram.
Thanks for dropping by and having a look at what I have created ... have a great week.
๐Ÿ’™ Stacy 


Friday 19 April 2019

Beautiful Together Layout with Lisa & the Skye kits

Hi there, Lisa here today to share a layout using the Skye kits.


I have been wanting to scrap this photo of my sister & her partner for a while now. Just a case of waiting for the perfect paper/collection.
The Skye kits hit it out of the park with so many possibilities with all the Cocoa Vanilla 'Midnight' goodies to choose from.

I am so happy with how it turned out & its created a real feature page for a special photo.

My sister had just been proposed to ๐Ÿ’—๐Ÿ’—๐Ÿ’—


We got this super gorgeous die cut piece & background in our kits.

I have seen lots of people create with this, with some really stunning outcomes.

I decided to use it a little but differently.

I offset the die cut by turning it slightly so it create a different look on the pattered backing.


In this photo you can see how I offset the die cut to the background paper.

I decided I wanted a stitched outline. I use a large eraser to sit behind the background (under where I want to pierce) then use my paper piercer to create holes. I do this by eye estimating the spacing, I am not looking for perfection, I just want it pleasing to the eye.
If you feel the need, you can certainly make small dots with a pencil first.


I did a simple back stitch with a double strand of gold thread.
A note...when I applied the adhesive the die cut to attach it to the background paper, I was careful to avoid outing any adhesive on the outer circle as I knew I would be stitching it.


Some close ups...lots of soft pretty layers.


The doilies from the kit are a great way to create layers softly.

The words are a fun & easy way to create a title.


Kits & collections make creating a layout much simpler, as all the matching up is already done for you. I try to pick out a few pieces to work with at a time, to simplify things.


Thanks for stopping by I hope you have enjoyed my share today. 


Lisa XO


Monday 15 April 2019

Messy Mondays

Art Journal 

You Bring Colour to My life


Happy Monday lovelies ... Hope you had a great weekend
It's that time of my week again where I get to share my art journal journey with 
This entry into my art journal was super fun to make and I used items from 3 different TCK.
Each week as well as learning new techniques to add into my art journal i have been teaching myself to blog. I am still finding what format I like the best so please let me know in the comments below what you think of how my Blogs come together. This week I am going to try not to  chit chat  so much and just make it more to the point with how my art journal entry was created.

This art journal entry i used 
American Crafts DIYshop gold acrylic paint from the 'Belle' TCK
Kaisercraft 12 x 12 template - Crosses from the 'Olivia' TCK
Tim Holtz Distress Paint - Blueprint Sketch from the 'Skye' TCK
all of these colour kits are available in The Scrappery Shop

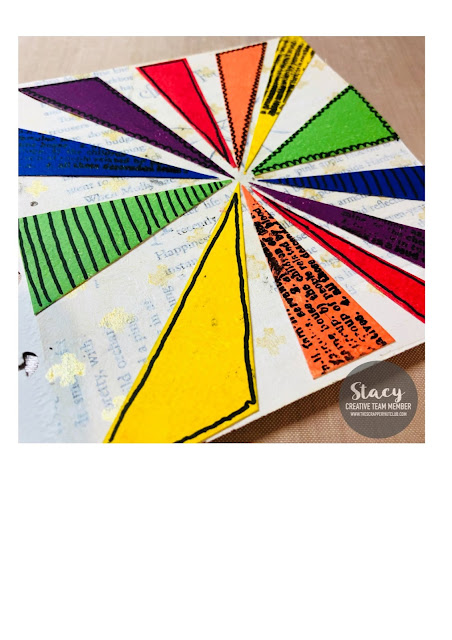
I tore up some old book pages and used gel medium to randomly stick them all over a page from my disc bound art journal.
On a scrap piece of mixed media paper I traced a sun burst pattern from another kaisercraft stencil i have in my stash and did a coat of white gesso.


After I let the gel medium dry on the page with the book page background I also did a coat of white gesso on that to dull the print on the book pages.

Waiting again for the gesso to air dry, I then used a small cheap make up sponge from my stash to dab the gold acrylic paint ( belle TCK ) through the crosses template ( olivia TCK )
which I placed onto the page on an angle to make the crosses look like stars.

I was really happy with how the template worked with the acrylic paint which has a shiny finish when caught in the right light ( as you can see in the photo above )


Next step was to cut out the sun burst pieces I had covered with white gesso and to paint them with rainbow colours of Tim Holtz distress paints including the blueprint sketch.


I thought that the colour blocks looked great but with it being an art journal page I decided why not go a few steps extra ... i used a newsprint stamp with versafine black onyx ink and my favourite faber-castell black brush pen to do some doodling. I then took a random circle punched piece of card stock sitting on my desk covered it with some scrap book page added some white gesso ... finger painted some of the gold acrylic paint around the outside and stamped ' You Bring Colour to My life ' with the versafine ink. I glued all the sunburst pieces in order on the art journal page and placed the last minute circle embellishment in the centre and I think this completed this art journal entry nicely.

So what do you guys think ? Please do not be afraid to leave you're opinions in the comments below, feed back on my art journal journey and also how I am going with the blogs would be gratefully appreciated.

Until next Monday (Happy Mail Monday) have a fantastic week
๐Ÿ’™ Stacy

Friday 12 April 2019

Card & Tag set using the SKYE kits - with Lisa

Hi there Scrappery Peeps ๐Ÿ’•

Welcome back to another share.
Today I am sharing a Card & two tags I have created using the 'Skye' kits.


I love the soft water colour florals in the kits. We also got some amazing liquid watercolours in the colour kit to play with.


I popped a tiny dot of each of these paints on my craft mat then blended with water until I got the desired strength.

The colour pigment level is so intense & amazing.


I used some of the floral printed patterned paper from the collection (black outline on white background) I coloured in the flowers with the watercolours, then fussy cut them out.


As you can see I got several different shades of pink & purple by adjusting the amount of water with the pigment.

The 'Skye' Kits & the 'Cocoa Vanilla' collection 'Midnight' have lots of beautiful floral elements to choose from. They are mostly in soft pastels & a watercolour look.

By making your own painted images this stretches your kit even further whilst having a play with some mixed media. This level of mixed media is great for someone wanting to give it a go without getting too messy!


This simple yet pretty card shows how I used some of the pre cut chipboard & die-cuts from the kit to compliment the hand painted flowers I created.


There are so many pretty elements in the 'Skye' Kits, which makes it so easy to create a card or tag just by creating some simple layers.

I love the silver Puffy hearts from Freckled Fawn.


Thanks for stopping by the blog, I hope you have enjoyed my share today.

Make sure you check out kits & more in the shop.


Wednesday 10 April 2019

More Cards with Cathi and the Skye Kits!


Hello scrappy friends! It's me, Cathi, back again. This week I would love to share another set of three cards I have made using the Skye kits which feature the gorgeous Cocoa Vanilla Studios Midnight collection.  I just love the mix of the soft pinks in this kit with the nearly navy blues and purples, really gorgeous and unique!!  I still have so much left in my kits, but I have used quite a bit of the ephemera in all my projects!! You can see the colors link all the cards here together, as well as the stitching that I did on each of the cards. Next week I hope to do a mixed media project with the gorgeous Colour Kit (TCK)!! 

For my first card I used the beautiful Cocoa Vanilla Studios Midnight Bloom and Grow paper from the main Scrapbooking Kit (TSK).  I layered a smaller piece of the gorgeous watercolour paper Moonlight paper again from the TSK.  I added a stitched border to the smaller layer and popped it up on foam tape to add dimensions.  I then added lots of layers to the card, starting with the floral genometric shape from the ephemera found in the Bits & Pieces Kit (BPK). I then layered a cardstock sticker that says "love you so" from the Pretty Little Kit (PLK). Next I added a chipboard heart from the TSK, along with the Hello Lovely flair button. The gray flower is another lovely piece from the ephemera pack in the BPK.


My next two cards use the gorgeous Moonlight paper from the Cocoa Vanilla Studios Midnight collection.  For this card, I chose a cutout quote "let joy be your compass" for the main sentiment for the card. The cutout sheet can be found in the PLK.  I popped the sentiment up on foam tape for dimension and then added a chipboard heart and pretty little girl flair button from the TSK. The purple-black heart and the heart flag are both from the ephemera pack in the BPK.  I finished off the card with a stitched border.


For my final card I used a doily from the BPK. I layered the floral tag flowers and heart from the BPK ephemera pack as well.  The little "UR" stickers can be found in the PLK, and the wonderful banner and grey chipboard heart can both be found in the TSK.  Again, I finished off this card with some stitching around the border.

I really love how this set turned out, even if I have used up most of the ephemera pack now!! I hope you enjoyed my card set with the Skye kit and will consider subscribing. You can find the subscriptions HERE. I've got another layout and more cards coming up soon! Hope to see you back soon!!

Tuesday 9 April 2019

happy BIRTHDAY - Lydia

Happy Tuesday, I hope you are all having a great week so far. I am back today here in the blog to share a quick little birthday card and tag using the Skye Kits.


While working with these kits I noticed how versatile they are and that you could easily create girl and boy projects using the colour palettes.


Can I just say how in love I am with those small alphas that are in the kit. And even better that the pack includes four different colours.

And of course I used one of my favourite delicate doilies on the card.


Here is the little tag I made alongside the card. I used one of the watercolour products that was in the mixed media kit also to add some splatters.


Again I hope you are all having a great week so far and find some time this week to do something a little creative.

Lydia xxx