Showing posts with label Stacy. Show all posts

Monday, 15 July 2019

Amora Kit Creations

Amora Kit Creation #2 with Stacy


Hello Lovelies ... thanks for taking the time to come and have a look at my creations from the last couple of weeks that I have made from the amazing Amora Kit.

Creation #2 is a Happy Mail Tag Flipbook.

I decided to make this a very pretty project and the colours and pretty items that are included in the Amora kit made it very easy to put it together ...

I copic coloured Stamping Bella images and thought the images went well with my pretty theme.


For one of the pages I created a crape paper rosette adding it to a doily from the Amora kit and topping it with a tulle bow, a paper flower, and a tiny tag with one of the word stickers from the Cocoa Vanilla Studios Sticker sheets all included in the TSK & BPK


To finish up creation #2 I used a quote from the Happiness 12 x 12 cut apart sheet included in the PLK.
I am very pleased with how this pretty little Happy Mail come together ... 


Amora Kit Creation #3 with Stacy 

Deciding to go with an off the page project this time i chose to decorate a mini clipboard.


Firstly I have been wanting to use the beautiful The Scrappery packaging into my crafting so in this creation the backing for my digital stamped image from All Dressed Up is the gorgeous black and white packaging you will recognise from the kits, I think the black and white stripes look amazing with the beautiful colours included in the kits.


On the removable focal point, copic coloured digital stamp is framed with a frame from the Happiness ephemera and I have attached a paper tassel also from the ephemera. Along with the paper flowers included in Amora Kit I put in a few from my stash.

When removing the focal point the clipboard is still very usable. I have used scrap pieces of paper and glued them down randomly adding a doily and doing a layer of mod podge over the lot. After that had dried I put on a word also from the Happiness collection ... and a scrap piece of lace I had on my desk and thought it was perfect with this Kit.


I hope you have enjoyed what I have shared with you this week. I had so much fun making creation #2 & #3 from the Amora Kit and maybe I have inspired you to make something a bit different then a scrapbook layout or a page in your project life. With all the goodies that are included in The Scrappery Kits why not do it all.
Please if you have any questions do not hesitate to ask in the comments below.

To purchase the Amora Kits please contact Ronelle via email through The Scrappery online shop.

Unitl next time ... take care 
๐Ÿ’™ Stacy 


Monday, 17 June 2019

Happy Mail Monday

Happy Mail #1 Amora

with Stacy

Heya lovelies ... seems like a hot minute since I have shared any creations on the blog, but so super excited to share the very first Happy Mail I made using the amazing new
 Amora TSK , PLK & BPK.


There is 4 different elements to this Happy Mail 
Element no.1 is this beautiful Purse style embellishment box which I created using a tutorial from a very talented paper crafter that i follow on YouTube. Sherry's channel is 
The Posh Paper Lady and this is the link to the tutorial for the purse I made.
Please take the time to have a look at Sherry's channel I promise you will not be disappointed and will want to make all the pretty things.
To make the purse I used a 12 x 12 pattern paper sheet from the Amora TSK which features products from another spectacular collection from Cocoa Vanilla Studios 'Happiness' 1 sheet of coloured card stock and I die cut the bow from a 6x4 card from the Amora PLK.
Element no. 2 is a die cut key chain fob which I cut from Navy card stock, I die cut another smaller bow from the same pattern paper. The bow is glued onto a part of the pretty applique that is in the BPK and I added a paper rose that is included in both the TSK & the BPK in the centre and made a little paper tassel from some of the scrap pattern paper.

Element no. 3 is a mini tag flip book ... I just put together a few pieces of card stock and covered them with a variety of different papers from the Amora Kits. Copic coloured and paper pieced some stamped images and decorated the pages using ephemera, paper flowers,cut apart  and doilies from the Kits. All of the mini pages are bound together with a book ring and along with the teal coloured string from the Amora kit i added some different trims to make a tassel to hang from the book ring.

Element no.4 is a shaker memory dex card. To create this I used pattern paper from the Amora TSK . I copic coloured and paper pieced another stamped image using a 3x4 card from the PLK to paper piece her dress and hat. I used some acetate and sewed this onto the memory dex card to make a little pocket to hold the sequins that are included in both the TSK & BPK . The scallop shaped  strips I cut from the cut apart sheet included in the TSK. I used the stay colourful ephemera piece from the Happiness collection which is backed with a tab from the cut apart sheet that is included in the PLK. I also added some paper flowers on the front of the Memory dex card ( you can never have to many pretty paper flowers )

 I am so pleased with how this came together with all 4 elements not only fun to make but have turned out stunning as everything across all kits just come together and make creating pretty things a breeze.To become part of The Scrappery subscription family send an email to   scrapperykitclub@gmail.com but be quick as there is only limited quantities of this stunning kit left.
I hope you all enjoy the first of my 'Amora' creations and cant wait till I have another to share with you guys ... 
until next time 
๐Ÿ’™ Stacy x


Monday, 22 April 2019

Happy Mail Monday


Stretching my Skye Kit

with Stacy


Welcome back lovelies to Happy Mail Mondays.
This week I will be showing you how I made what I had left from the TSK & BPK  Skye kits stretch to make one more creation even with only having the smallest amount of one piece of the pattern paper left. (see photo above).

I took from my stash papers I liked that went with the remaining pattern paper from the TSK.
In the photo above are a collection of different pattern papers and coloured card stock. I didn't choose anything that was going to take away from the ephemera pieces and stickers i had left to use. 

Front cover - Frames and heart tab were in the 'Midnight' ephemera pack from Cocoa Vanilla Studios ( PBK ), the chipboard banner was from the Cocoa Vanilla Studios 'Midnight' chipboard pack.
The little girl is a CC designs stamp and I stamped her used my Copics to colour her and then stamped her again on the piece of pattern paper I still had from the 'Skye' TSK and paper pieced her little dress and shoes.

The 2nd & 3rd pages of the Flip Book include a memory dex card ( on the left ) i will get back to that a little later. On the opposite page I again stamped a CC designs stamp but this time left her black and white just using some Stickles to add some sparkle to her skirt. I used a frame from the chipboard pack and randomly placed ephemera around the outside of the frame. On the tab I used one of the little word stickers from the sticker pack from the 'Midnight' collection which is included in the BPK. I was really happy how pretty this page turned out.

This is the Memory Dex Card ( if you are unsure of what a memory dex card is there are a lot of videos about them on YouTube and lots of posts on Pinterest) I really like adding them when I make Happy Mail as a lot of my PenPals collect them & it is another different type of paper craft to enjoy creating.
This particular memory dex card I made using a die i have and it is a little pocket. I used magnets as a closure to keep the flap closed and then I cut flowers from the papers i was using including the paper I had left from the 'Skye' TSK. When i was die cutting the flowers I had the idea that maybe when I use the brad to keep the flowers together they would magnetically join to the magnet i had hidden in the flap of the memory dex card & my idea was a success letting me interchange the different flowers. I have never seen this done before & was thinking of all the possibilities that I could make for future memory dex cards. Not only using brads in different shapes but also adding metal pieces. 
I call this the interchangeable Memory Dex Card.


The 3rd & 4th pages ... On the 3rd page I made a pocket and added some die cut paper bags, on the front of the pocket I added a decorated one of the die cut paper bags using paper scraps and a flair from the 'Midnight' collection from the TSK. Inside the paper bag I added some ephemera to share with my PenPal. Page 4 is another page I had fun decorating using a beautiful doily ( there was doilies included in both the TSK & BPK )
I again used a CC design stamp and copic coloured and paper pieced her.

The 5th & 6th pages - Page 5 ( on the right in the photo above ) is my 3rd decorative page using chipboard pieces & ephemera with my copic coloured and paper pieced image.


 The 6th page is a pocket I made with a flap that has  a  tab closure with velcro on it.
I made some decorated die cut tickets and added some blank ones for my PenPal to have to decorate.On the outside of this flap i used a doily (from my stash) some of the pattern paper from the TSK  as well as an ephemera piece from BPK and a little word sticker from the sticker pack in the BPK. Inside the pocket I again used more ephemera pieces.

In the photo above are the items I have left from the 'Skye' TSK, BPK, & PAK.
Pieces I will now add into my stash from this kit I have made 
3 very chunky Happy Mails,
 a box of note cards,
 used some of the paper in my art journal
 so as you can see you will really get your money's worth when purchasing kits from
The Scrappery. I have one more Project that will Probably share on The Scrappery Instagram.
Thanks for dropping by and having a look at what I have created ... have a great week.
๐Ÿ’™ Stacy 


Monday, 15 April 2019

Messy Mondays

Art Journal 

You Bring Colour to My life


Happy Monday lovelies ... Hope you had a great weekend
It's that time of my week again where I get to share my art journal journey with 
This entry into my art journal was super fun to make and I used items from 3 different TCK.
Each week as well as learning new techniques to add into my art journal i have been teaching myself to blog. I am still finding what format I like the best so please let me know in the comments below what you think of how my Blogs come together. This week I am going to try not to  chit chat  so much and just make it more to the point with how my art journal entry was created.

This art journal entry i used 
American Crafts DIYshop gold acrylic paint from the 'Belle' TCK
Kaisercraft 12 x 12 template - Crosses from the 'Olivia' TCK
Tim Holtz Distress Paint - Blueprint Sketch from the 'Skye' TCK
all of these colour kits are available in The Scrappery Shop

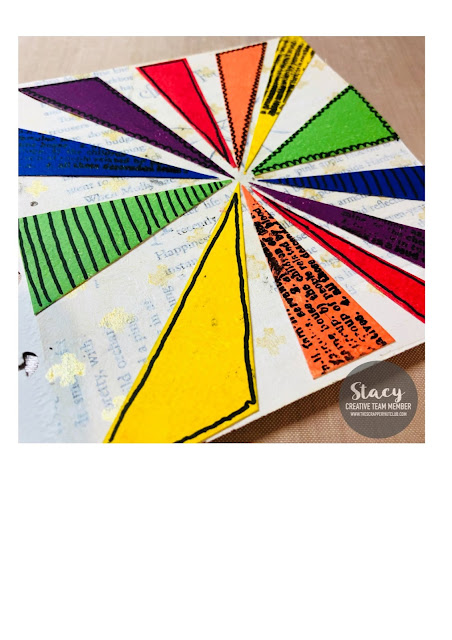
I tore up some old book pages and used gel medium to randomly stick them all over a page from my disc bound art journal.
On a scrap piece of mixed media paper I traced a sun burst pattern from another kaisercraft stencil i have in my stash and did a coat of white gesso.


After I let the gel medium dry on the page with the book page background I also did a coat of white gesso on that to dull the print on the book pages.

Waiting again for the gesso to air dry, I then used a small cheap make up sponge from my stash to dab the gold acrylic paint ( belle TCK ) through the crosses template ( olivia TCK )
which I placed onto the page on an angle to make the crosses look like stars.

I was really happy with how the template worked with the acrylic paint which has a shiny finish when caught in the right light ( as you can see in the photo above )


Next step was to cut out the sun burst pieces I had covered with white gesso and to paint them with rainbow colours of Tim Holtz distress paints including the blueprint sketch.


I thought that the colour blocks looked great but with it being an art journal page I decided why not go a few steps extra ... i used a newsprint stamp with versafine black onyx ink and my favourite faber-castell black brush pen to do some doodling. I then took a random circle punched piece of card stock sitting on my desk covered it with some scrap book page added some white gesso ... finger painted some of the gold acrylic paint around the outside and stamped ' You Bring Colour to My life ' with the versafine ink. I glued all the sunburst pieces in order on the art journal page and placed the last minute circle embellishment in the centre and I think this completed this art journal entry nicely.

So what do you guys think ? Please do not be afraid to leave you're opinions in the comments below, feed back on my art journal journey and also how I am going with the blogs would be gratefully appreciated.

Until next Monday (Happy Mail Monday) have a fantastic week
๐Ÿ’™ Stacy

Monday, 8 April 2019

Happy Mail Mondays

Stacy & the 'Skye' Kit


Hello Lovelies ... This Monday I am coming at you with something a little different ... my projects of choice for The Scrappery Design Team are Art Journaling (as you have seen on Messy Monday's on this blog) that I am a newbie to, and my other crafty passion is creating and sending out Happy Mail to people all over the world. I have been doing Happy Mail for coming up to 3 years (WOW where does the time go) and I am still very much in love with the concept as I was when I first discovered it on Pinterest. This will be my second Happy Mail I have created with the fantastic 'Skye' kit using the TSK , BPK & PAK..
This Happy Mail was sent all the way to Texas, USA.
The size is pretty much the same as a personal Travellers Notebook. I chose some digital stamps that i have in my ever-growing digital stamp library (I think i may have a problem lol) these particular digital stamps are from Tiddlyinks & I Copic coloured them to coordinate with the beautiful Cocoa Vanilla Studios 'Midnight' collection which features in the 'Skye Kits'
The very pretty and glittery Bonjour thickers which are included in the TSK make a beautiful feature of the recipients name.
This Happy Mail that I created is a tri-fold type booklet with 2 fold out's and a pocket. 
With plenty of beautiful papers ( TSK )  to choose from even after already making my first Happy Mail and having the coordinating solid colour cardstock from the PAK made this project come together so easily ...


Once the foundation of the Booklet was made and I laid down all the pretty papers it was time to make it extra pretty with the Cocoa Vanilla Studio 'midnight' die cut ephemera & clear stickers included in the BPK. I used dies from my stash to cut out of scraps that I had no intentions of wasting to make little envelopes for my Happy Mail penpal ... also out of the scraps I made a little banner just cutting out small triangles and attaching them to a piece of string I had lying on my desk. 

In the photo below is the first fold out (on the right ) on this page I included some more dies cut from the pattern paper & from the plain coloured cardstock. On the page in the middle, I used another digital stamp from Tiddlyinks and Copic coloured her. The frames the heart and the tab are all from the die cut ephemera (BPK) and the vellum behind the background frame is also included with the pattern paper in the TSK. It is a awesome quality A4 sheet of vellum from American Crafts, just adds a little bit of softness to the background.

This photo below is the second fold out. I attached a envelope using some pattern paper to hold my note for my pen pal and I just had to share some of the amazing pretty bits that are included in both the TSK & BPK. In with these pretty  are a whole lot of pretty ... including beautifully matched sequins ... beads ... little charms ... dainty paper doily ... the tag that I used to tie on the little pack I am sharing was even in with the pretty bits.


I finished off this Happy Mail by making a Memory Dex card using little bits and pieces I had left over from the pattern paper and cardstock.
I hand made a rosette using my score board. I die cut and embossed a circle and placed a die cut ephemera piece on top ... with more little off cuts of pattern paper I die cut a tiny bow and sat it as the final layer for my rosette. I used another embossing folder to emboss the coloured cardstock from the PAK and stuck it all to my memory dex base I had also die cut. Packed in a self sealing plastic bag and made my own bag topper with some more off cuts and added a heart and xoxo piece from the die cuts.


 My Happy Mail pen pal loved what I had made for her and I am hoping that you guys like it also ... I think a lot of scrapbooking techniques are incorporated into making Happy Mail when it comes to the decorating so maybe I may inspire some scrappy ladies also ... thanks once again for taking the time to catch up with me on a Monday ... from now on every second Monday will be Messy Monday's ... with every other Monday being Happy Mail Monday's ... I really hope you come back again 
๐Ÿ’™ Stacy