Showing posts with label Mixed Media. Show all posts

Wednesday, 7 August 2019

Amora Mixed Media Canvas with Cathi


Hello scrappy friends! It's me, Cathi, back again.  This week I have a mixed media canvas where I used my Colour Kit (TCK) and all the rest of the kits gorgeous contents. I had a great time putting this together and getting messy and creative!


The base of my canvas is scraps of all the gorgeous papers from Cocoa Vanilla Studio's Happiness collection from the main Scrappery Kit (TSK)!! I adhered them to my canvas using gel medium and then sealing them in with the medium as well. This is a great way to use up all those off-cuts and scraps from the kit!


In this first close up you can see the doily from the Bits and Pieces Kit (BPK). The gorgeous butterfly die cut is in the from the TSK.  I used the Kaisercraft templates and the Dazzlerz Foiled Again Texture Paste from the TCK to make some gorgeous patterns on my canvas.


I took the Shimmerz Orange Sherbet paint as well as the texture paste to add some color and texture around the edge of the canvas. The paper word stickers are from the Pretty Little Kit (PLK) and the pink paper flowers are from the TSK.


Here you can see more of the pink paper flowers and the beautiful lace flower on top of the beautiful butterfly die cut from the TSK.


In my final close up I have added the die cut ephemera Thankful word from the TSK to finish off the canvas. I wanted the canvas to have inspiring words along with the symbol of beauty and freedom the butterfly represented. I love the word stickers and the ephemera for adding inspiration!

I am so glad I got messy this week with the kits!  I hope you enjoyed the canvas and will consider subscribing. You can find the subscriptions HERE.  Hope to see you back soon!!

Monday, 15 April 2019

Messy Mondays

Art Journal 

You Bring Colour to My life


Happy Monday lovelies ... Hope you had a great weekend
It's that time of my week again where I get to share my art journal journey with 
This entry into my art journal was super fun to make and I used items from 3 different TCK.
Each week as well as learning new techniques to add into my art journal i have been teaching myself to blog. I am still finding what format I like the best so please let me know in the comments below what you think of how my Blogs come together. This week I am going to try not to  chit chat  so much and just make it more to the point with how my art journal entry was created.

This art journal entry i used 
American Crafts DIYshop gold acrylic paint from the 'Belle' TCK
Kaisercraft 12 x 12 template - Crosses from the 'Olivia' TCK
Tim Holtz Distress Paint - Blueprint Sketch from the 'Skye' TCK
all of these colour kits are available in The Scrappery Shop

I tore up some old book pages and used gel medium to randomly stick them all over a page from my disc bound art journal.
On a scrap piece of mixed media paper I traced a sun burst pattern from another kaisercraft stencil i have in my stash and did a coat of white gesso.


After I let the gel medium dry on the page with the book page background I also did a coat of white gesso on that to dull the print on the book pages.

Waiting again for the gesso to air dry, I then used a small cheap make up sponge from my stash to dab the gold acrylic paint ( belle TCK ) through the crosses template ( olivia TCK )
which I placed onto the page on an angle to make the crosses look like stars.

I was really happy with how the template worked with the acrylic paint which has a shiny finish when caught in the right light ( as you can see in the photo above )


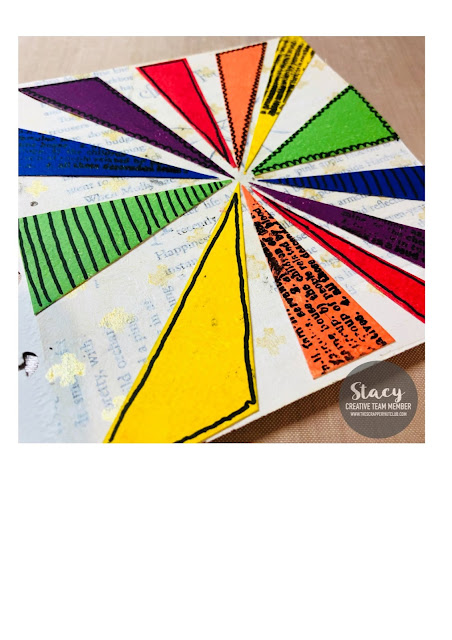
Next step was to cut out the sun burst pieces I had covered with white gesso and to paint them with rainbow colours of Tim Holtz distress paints including the blueprint sketch.


I thought that the colour blocks looked great but with it being an art journal page I decided why not go a few steps extra ... i used a newsprint stamp with versafine black onyx ink and my favourite faber-castell black brush pen to do some doodling. I then took a random circle punched piece of card stock sitting on my desk covered it with some scrap book page added some white gesso ... finger painted some of the gold acrylic paint around the outside and stamped ' You Bring Colour to My life ' with the versafine ink. I glued all the sunburst pieces in order on the art journal page and placed the last minute circle embellishment in the centre and I think this completed this art journal entry nicely.

So what do you guys think ? Please do not be afraid to leave you're opinions in the comments below, feed back on my art journal journey and also how I am going with the blogs would be gratefully appreciated.

Until next Monday (Happy Mail Monday) have a fantastic week
💙 Stacy

Tuesday, 9 April 2019

happy BIRTHDAY - Lydia

Happy Tuesday, I hope you are all having a great week so far. I am back today here in the blog to share a quick little birthday card and tag using the Skye Kits.


While working with these kits I noticed how versatile they are and that you could easily create girl and boy projects using the colour palettes.


Can I just say how in love I am with those small alphas that are in the kit. And even better that the pack includes four different colours.

And of course I used one of my favourite delicate doilies on the card.


Here is the little tag I made alongside the card. I used one of the watercolour products that was in the mixed media kit also to add some splatters.


Again I hope you are all having a great week so far and find some time this week to do something a little creative.

Lydia xxx

Monday, 25 March 2019

Messy Monday #2 with Stacy and the Skye Kits


Hey lovelies, Stacy here, and welcome back to Messy Mondays. If your new thanks for taking the time to have a look and a read, I hope you will all stick around and follow my art journal journey with The Scrappery.


This week my art journal page has some similar techniques as my first Messy Monday page with a few new ones that I need to work on. I was very close to tearing up this page and starting again as I am a perfectionist and finding it hard to let things just flow … The brush lettering was the last thing I added to the page and it was the first time I had attempted writing using this type of pen, although I am not super excited how the lettering ended up looking I was strong-willed and reminded myself this is all part of the journey … so here we go, the process of how this page come together …


Step One. Using a page from my disc-bound journal I taped all 4 sides with painters tape making sure to leave a frame for my background. For the background, I used the Blueprint Sketch Distress Paint from The Colour Kit (TCK) as well as Chipped Sapphire and Seedless Preserves from my stash. With a wet wide paint brush I did wide strokes across the page from left to right using about 1/3 of the page for each colour, overlapping them to blend the colours together. I then sat that aside to air dry.


Step Two. I stamped the butterfly images onto 300gsm watercolour paper with versafine black onyx ink and also stamped some butterflies on some scrap pieces of pattern paper I had left from the main Scrapbooking Kit (TSK).


Step Three. I fussy cut the butterflies and just the dress from the pattern paper so I could
paper piece it to my Gorjuss girl image after I had coloured her skin and hair with my copic markers. Then I fussy cut the whole image and cropped it down to the size I wanted for my page.

Step Four. I took the fussy cut butterflies that I had stamped on the watercolour paper and used the Ken Oliver and Hero Arts liquid watercolours and the watercolour brush from the TCK and messily coloured the butterfly images.


Step Five. The background had now dried so I slowly removed the painter's tape. I used a piece of one of the pretty doilies that are included in the TSK and the Bits and Pieces Kit (BPK) and used it as a layer piece between my Gorjuss image and the background. I used 3 of the butterfly images along the top of the page and one of them as an oversized hair decoration on the Gorjuss image, ( I love how this looks). I stuck everything to the page using scotch tacky glue.


Step Six. I knew when I decided to use the butterfly stamps that I wanted to use the quote ‘without change there would be no butterflies’  but had no idea how I was going to place it on the page. I decided on writing it around the border with a brush lettering pen which I had never used before but just went for it. As I said earlier I'm not super happy with how it came out but its there now and I have it to look back on in the future to see if I have made progress with my brush lettering skills.


So that is #2 to add back into my journal. I hope you enjoyed reading my little part for The Scrappery Design Team and you come back next week for #3 in my  Messy Monday’s Art Journal Journey.

Have a great week.

Friday, 14 April 2017

Mixed Media Cards with Lisa

Hi there
Lisa here today sharing three cards I have made using the "Jade" kits.


I had 2 goals when creating these cards...
One was to use all the mixed media goodness in the kits & lets be honest sometimes paper on 
its own with embellishments is easy as my go to.
So this meant, paint, ink sprays, stencils & stamps!
These kits were packed for of MM goodness!
Secondly I was aiming to create both feminine & masculine cards.
So I came up with a pretty pink & floral card, a bold black, white & orange card & a more general blue with brights.


The pink & floral is possibly my favourite of the three. I created the background by mixing texture paste with the Kaisercraft pink paint & the Kaisermist in pink together to get the desired colour.
I applied it over the rose stencil.
I sped up all drying time with a heat tool.
I layered with a doily, a die cut I cut from the Cocoa Vanilla cut a part & some of the Kaisercraft flowers.


My second card went a bit unplanned initially, I tried the Kaisermist (winter grey) over the chevron stencil. As its obviously a liquid it seeped quite a bit. Anyway, I dried it off - it gave it quiet a nice effect almost embossed.
Once dry, I stamped using Staz On randomly on the card.
A few punched circles, paper strips, a stamped image & black pearls to complete it.


For the 3rd card I had another go with the chevron stencil. This time I mixed the Kaisermist with the texture paste to create a soft silver/grey look. Once dry I used some Distress inks from my stash to build on the colour & bring in blue/green.
I then just added fairly random strips of paper, layering them at different heights for effect.
I added some bling & I was done.

I hope you've enjoyed my share today. 
Make sure you check out our kits & other goodies in the shop.

Lisa XO 


Saturday, 25 March 2017

Mixed Media Canvas using the Jade Kits


Hello scrappy friends, Cathi back again! This week I am back with something a bit different! I did a mixed media canvas using the Color Kits from the Jade and Nigella kits, along with cutaparts from the Pretty Little Kit (PLK) and doilies from the main kit (TSK).  Something a bit different, but I love how it turned out!! Lots of layers of colors and I like how some of the patterns are subtle building up the layers.


For this first photo you can see several patterns I did as well as the cut aparts.  I started the canvas my spraying the Kaisermist Pink and Winter Gray mists to do a full coverage of the canvas. I let the colors run down the canvas for some lovely effects.  Here you can see where I used the Kaisercraft Acrylic Pink paint from the TSK to make some roses with the stencil in the Jade color kit...subtle but gorgeous effect!


The chevron pattern is also a stencil from the Jade kit while the Heidi Swapp silver metallic texture paste came from the Nigella Color Kit.


Here you can see the roses popping out from the canvas adding subtle layers. I have added several doilies and cut outs to add detail and movement to the canvas.

I hope you enjoy seeing how versatile the Scrappery kits are each month!! You can subscribe to the kits in the store by CLICKING HERE!! Thank you so much for stopping by and visiting and hope to see you back here next week when I share a new project with the kits!!!

Thursday, 2 February 2017

12x12 Layout with Lisa

Hi there
Lisa back with you today to share a 12x12 layout using the "Nigella" kits.

I am still so in love with these kits, they are so full of goodies.
I have scrapped a photo of my daughter with her Calisthenics team in one of their comps.


My starting point for this layout was to use the colour kit Ronelle sent us this month. This is the first time we have had colour kits & they add so many possibilities to the kits.
I focused on the Heidi Swapp Silver texture paste. I used a plain card stock suitable for gentle mixed media use. I have a artists type comb in my stash which is what I used to scrape the paste back & forth until I got the desired look. The paste dries surprisingly quickly, which is  great as I am terribly impatient. I did use my heat tool to give it a gentle helping hand.


I then sprayed the Kaisermist in Turquoise (also in the colour kit) gently over the background.
I decided on the patterned paper that has the circle pattern as a strip matting and a doily to place my photo on. I then replicated the circles on the background by punching different sized circles around the page. Some circles I mounted on foam tape for dimension. I also used some puffy stickers, sequins & bling to balance everything out,

I hope you have enjoyed my share. If you would like to check out our kits & other shop items here.