Showing posts with label Cocoa Vanilla Studio. Show all posts

Friday, 26 July 2019

Lisa with a 12X12 Layout share using the Amora Kits

Hey There.

Lisa back again, to share a layout using the 'Amora' Kits.

Today's layout is a totally different look achieved with the same kits. I am sure you will agree these kits are at glance mostly soft florals with lots of pink and other pastels, as they contain the gorgeous Cocoa Vanilla 'Happiness' collection.


So as you can see this is a very BLUE layout, almost monochromatic. Different shades of blue with some touches if white.

I like to challenge myself and also try to think out side the square, I think it helps keep things interesting and extends the usability of a kit.

Once I decide to do a layout like this, I pick out as many papers and embellishments from the kit in this colour - I may not use them all but I have a selection to work with.


This design is very simple and clean, but still allows you to build the layers.
I basically cut each element in half and replicated it mirrored on each side.

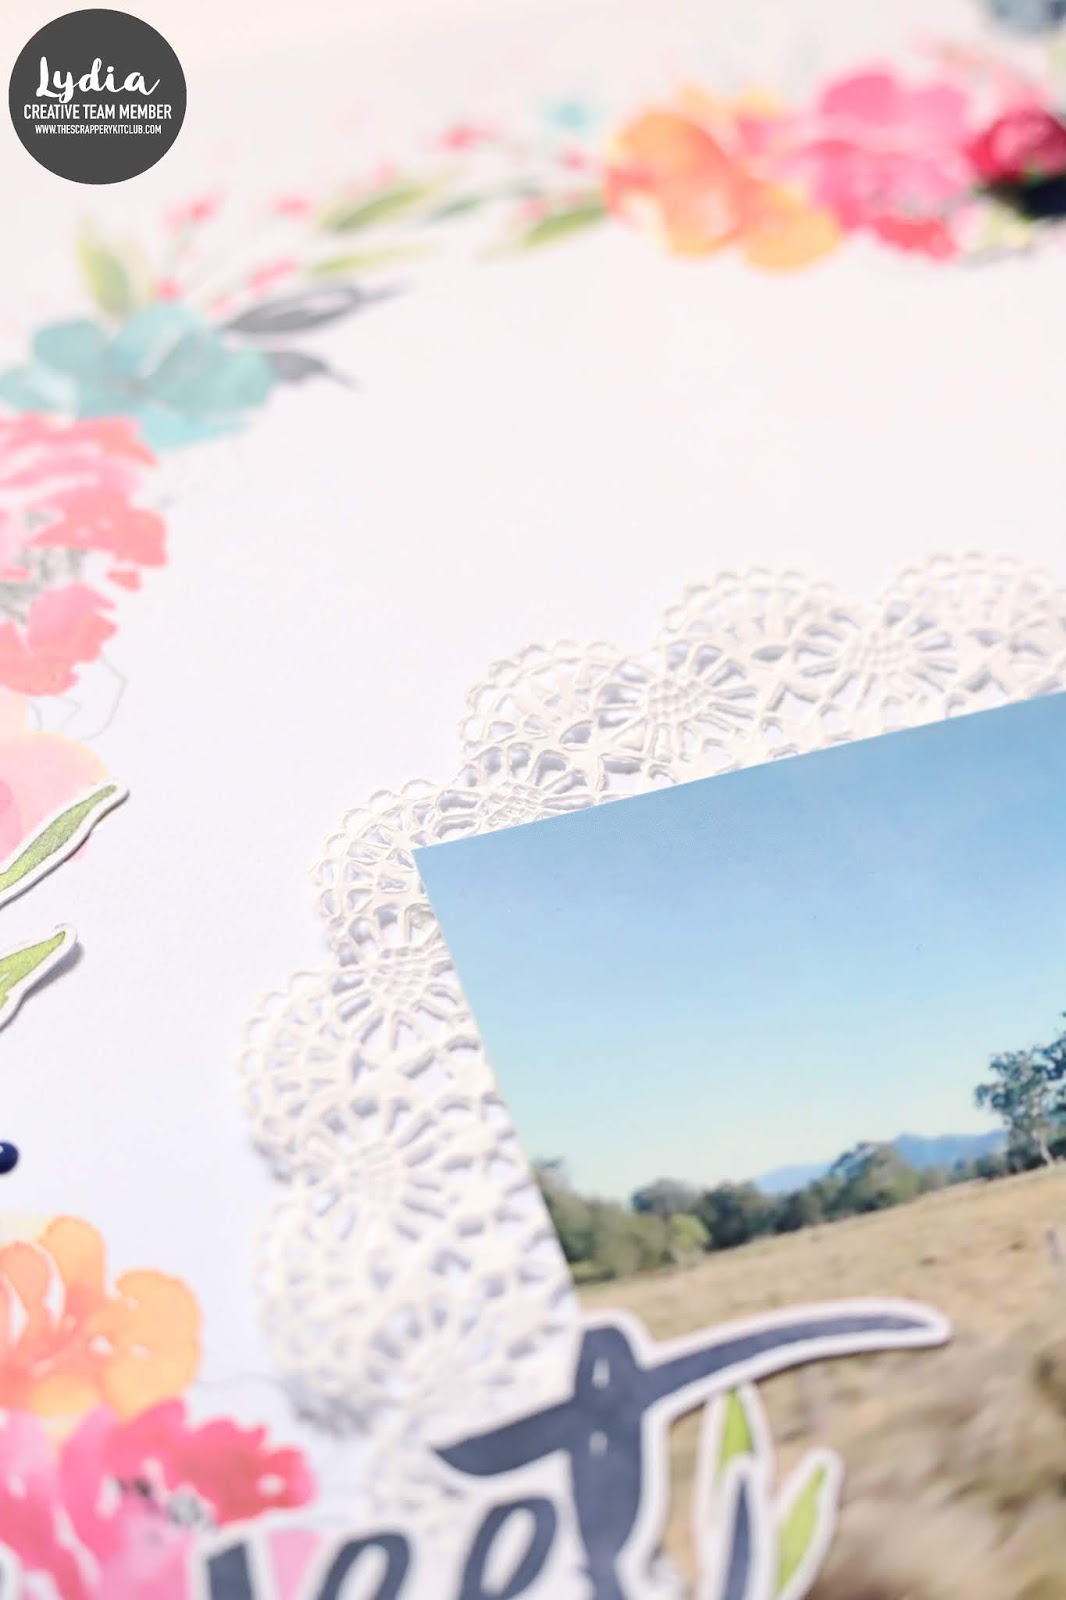
You can see the photo is almost a little over exposed with a blue tinge, which is also accentuated by the blue surrounding it.


Punching some shapes can help increase the amount of elements you have to work with in the same colour or coordinating.


The word pieces from Cocoa Vanilla make creating a title super simple.


Here you can see I embossed the first/last layer of white card layering to add more interest and texture. It also helps everything work together more cohesively. 

Some ephemera and enamel dots as always help bring everything together.


I hope you have enjoyed my share today and it encourages you to look at your kits and stash differently too.

Make sure you stop by the shop to check out all the goodies and kits available.

Have a great day :-)


Monday, 15 July 2019

Amora Kit Creations

Amora Kit Creation #2 with Stacy


Hello Lovelies ... thanks for taking the time to come and have a look at my creations from the last couple of weeks that I have made from the amazing Amora Kit.

Creation #2 is a Happy Mail Tag Flipbook.

I decided to make this a very pretty project and the colours and pretty items that are included in the Amora kit made it very easy to put it together ...

I copic coloured Stamping Bella images and thought the images went well with my pretty theme.


For one of the pages I created a crape paper rosette adding it to a doily from the Amora kit and topping it with a tulle bow, a paper flower, and a tiny tag with one of the word stickers from the Cocoa Vanilla Studios Sticker sheets all included in the TSK & BPK


To finish up creation #2 I used a quote from the Happiness 12 x 12 cut apart sheet included in the PLK.
I am very pleased with how this pretty little Happy Mail come together ... 


Amora Kit Creation #3 with Stacy 

Deciding to go with an off the page project this time i chose to decorate a mini clipboard.


Firstly I have been wanting to use the beautiful The Scrappery packaging into my crafting so in this creation the backing for my digital stamped image from All Dressed Up is the gorgeous black and white packaging you will recognise from the kits, I think the black and white stripes look amazing with the beautiful colours included in the kits.


On the removable focal point, copic coloured digital stamp is framed with a frame from the Happiness ephemera and I have attached a paper tassel also from the ephemera. Along with the paper flowers included in Amora Kit I put in a few from my stash.

When removing the focal point the clipboard is still very usable. I have used scrap pieces of paper and glued them down randomly adding a doily and doing a layer of mod podge over the lot. After that had dried I put on a word also from the Happiness collection ... and a scrap piece of lace I had on my desk and thought it was perfect with this Kit.


I hope you have enjoyed what I have shared with you this week. I had so much fun making creation #2 & #3 from the Amora Kit and maybe I have inspired you to make something a bit different then a scrapbook layout or a page in your project life. With all the goodies that are included in The Scrappery Kits why not do it all.
Please if you have any questions do not hesitate to ask in the comments below.

To purchase the Amora Kits please contact Ronelle via email through The Scrappery online shop.

Unitl next time ... take care 
๐Ÿ’™ Stacy 


Friday, 28 June 2019

Lisa with a 12X12 Layout The Amora kits


Hi there, Lisa here to share a layout using the Amora Kits ๐Ÿ’“


Now I know nearly every scrapper there ever was has already created beautiful pages with the Floral wreath that is from Cocoa Vanilla's 'Happiness' collection.


However I could not resist using it!

Here is my take on it.


I wanted to keep it fairly simple, as most of the work is already done for you. The beautiful florals and ink spots are just stunning.


My goal was to maintain the wreath as the main feature and duplicate some fo the floral by creating layers and depth.


I added quite a few of the die cut floral pieces to do this, adhering them with foam tape.

Some neutral layers and a pretty doily to matte the photo.


Here are some close ups of the layers and details.


Some tiny word stickers and sequins always add the final touches.


Adding a flair always adds another great feature and focal point.


Thanks for stopping by, I hope you have enjoyed my share.

Make sure you check out our kits and other goodies in the SHOP.


Monday, 24 June 2019

'Sweet Vibes' - Lydia


Lydia, back to share my first creation using the ever beautiful Amora kits from The Scrappery. What better way to start my University holidays than be creating? It feels like a lifetime ago since I felt and played with pretty paper and embellishments.


These kits are sure are full of those girly colours, butterflies and florals. But the kits are full of tones of blues too.


Of course, layout wouldn’t be mine if I didn’t include one of the delicate doily’s.


I hope you have all received your kits and I hope to see some of your creations over on the Facebook group. 

Have a lovely week lovely's.

Lydia xxx

Monday, 17 June 2019

Happy Mail Monday

Happy Mail #1 Amora

with Stacy

Heya lovelies ... seems like a hot minute since I have shared any creations on the blog, but so super excited to share the very first Happy Mail I made using the amazing new
 Amora TSK , PLK & BPK.


There is 4 different elements to this Happy Mail 
Element no.1 is this beautiful Purse style embellishment box which I created using a tutorial from a very talented paper crafter that i follow on YouTube. Sherry's channel is 
The Posh Paper Lady and this is the link to the tutorial for the purse I made.
Please take the time to have a look at Sherry's channel I promise you will not be disappointed and will want to make all the pretty things.
To make the purse I used a 12 x 12 pattern paper sheet from the Amora TSK which features products from another spectacular collection from Cocoa Vanilla Studios 'Happiness' 1 sheet of coloured card stock and I die cut the bow from a 6x4 card from the Amora PLK.
Element no. 2 is a die cut key chain fob which I cut from Navy card stock, I die cut another smaller bow from the same pattern paper. The bow is glued onto a part of the pretty applique that is in the BPK and I added a paper rose that is included in both the TSK & the BPK in the centre and made a little paper tassel from some of the scrap pattern paper.

Element no. 3 is a mini tag flip book ... I just put together a few pieces of card stock and covered them with a variety of different papers from the Amora Kits. Copic coloured and paper pieced some stamped images and decorated the pages using ephemera, paper flowers,cut apart  and doilies from the Kits. All of the mini pages are bound together with a book ring and along with the teal coloured string from the Amora kit i added some different trims to make a tassel to hang from the book ring.

Element no.4 is a shaker memory dex card. To create this I used pattern paper from the Amora TSK . I copic coloured and paper pieced another stamped image using a 3x4 card from the PLK to paper piece her dress and hat. I used some acetate and sewed this onto the memory dex card to make a little pocket to hold the sequins that are included in both the TSK & BPK . The scallop shaped  strips I cut from the cut apart sheet included in the TSK. I used the stay colourful ephemera piece from the Happiness collection which is backed with a tab from the cut apart sheet that is included in the PLK. I also added some paper flowers on the front of the Memory dex card ( you can never have to many pretty paper flowers )

 I am so pleased with how this came together with all 4 elements not only fun to make but have turned out stunning as everything across all kits just come together and make creating pretty things a breeze.To become part of The Scrappery subscription family send an email to   scrapperykitclub@gmail.com but be quick as there is only limited quantities of this stunning kit left.
I hope you all enjoy the first of my 'Amora' creations and cant wait till I have another to share with you guys ... 
until next time 
๐Ÿ’™ Stacy x


Friday, 14 June 2019

Lisa with some Interactive Memory Dex cards and a Gift Bag

Hey There.

Lisa here today to share my first creations using the Amora Kits  ๐Ÿ’—


Have you seen these Kits? They are so gorgeous, yes I always say that lol 

BUT ... They have so much Cocoa Vanilla Studio Happiness range in them and as usual Ronelle (Boss Lady) has done an amazing job adding lots of coordinating goodies.


My creations are a bit different today, lately I am addicted to making my own envelopes/bags.

I am also loving making Memory Dex cards!

I have a Rolodex, so I collect them myself - I also send them to friends as Happy Mail.


Once you start making these envelopes, you cant stop!

I have made them in all sizes!

They are really easy to make, you can find lots of tutorial online - just search for Policy Envelope.

They are a great way to use up your patterned paper pads, in this instance i used a 12x12 double sided paper from the kit. 

I made a bag topper using some patterned paper scraps and some ephemera.


I add some double sided tap to the seal of the envelope, but I don't use it - I keep it for my recipient, so they can re-use it.  Just use some low tack washi to close it.


The first card is a pretty shaker window feature.

The sequins in this kit are Divine, the colour palette!

I used the tulle in the kit instead of acetate to hold the sequins in and add interest.

Remember even if you don't make or collect Memory Dex cards, my idea can easily be transferred to a card, a layout or a journal.


I made the circular shaker piece using a die cut from the ephemera pack.

I then adhered it to my card base with foam tape, then layered it up with lots of pretties.


This next Memory Dex is a little different on how it is interactive.

Quite often in Happy Mail Tea of Coffee bags are exchanged as a fun little token

I made this card heavily focused on butterflies and decided to add a belly band to hold a tea bag.


I also made a little pocket to hold a tag on the reverse.

This card was all about the colour pallet, butterflies and layers.

Here is a pic of the front without the Tea bag inserted.


I kept the tag on them using some of the butterfly stickers from the  sticker sheet.


Here is the reverse of the card, a mini pocket to fit my tag.


I really apologise for the varied lighting in the photos, Melbourne's Winter uggghh...Even editing them leads to such inconsistency.


Thanks for stopping by, I hope you have enjoyed my share today.


Lisa XO

Friday, 10 May 2019

A Mini Pocket Letter/Happy Mail with Lisa

Hi there.

Lisa here today to share a project I have created using the Skye kits.

Get ready for Cocoa Vanilla 'Midnight' overload!

Today I have a mini pocket letter which I am going to send to a friend as some Happy Mail.


I am nearing the end of my kits, so this project is perfect to make - it uses up lots of bits & pieces.

I used a coin collectors plastic sleeve, as I really like the size of the squares. Super cute!


I have lots of close ups for you today. Rather than babble on, you can check out the pics - they are pretty self explanatory.


You name it, I have used it. Scraps of paper, tags, stickers, flair.


I have filled quire a few of the pockets with pretties that my Happy Mail recipient can use.

Stickers, Tags, Wood Veneer, sequins & Bling.


Make sire you check out our kits & all the other goodies on our website.


Thanks for stopping by, have a great week.